
Shower Valve Height Guide: What Should Be the Right Placement for Installation?
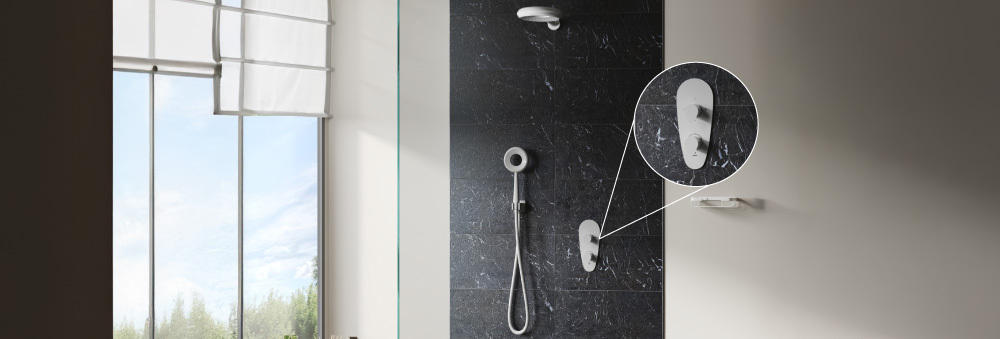
Choosing the right shower valve height may seem like a minor detail, but it can have a significant impact on the comfort, usability and appearance of your bathroom. A valve that is positioned too high, too low or in an inconvenient location can make everyday shower controls difficult to reach and may also create complications during installation.
The ideal shower valve placement depends on more than a standard measurement. The type of shower, finished floor level, wall construction, shower enclosure, number of outlets, valve design and the people using the bathroom all need to be considered. Concealed shower valves require additional planning because the valve body sits behind the finished wall, making installation depth and pipework particularly important.
Whether you are installing a new shower, replacing an existing system or planning a complete bathroom renovation, understanding how to position the valve correctly can help prevent costly adjustments later.
In this guide, we explore the key considerations behind shower valve height and placement, including concealed and thermostatic valves, multi-outlet shower systems, pipework, accessibility, tile alignment, servicing and pre-installation checks, helping you plan a shower that is both technically sound and comfortable to use.
Why Is Shower Valve Placement Important?
The position of a shower valve affects how easily you can control water flow and temperature every time you use the shower. While it may appear to be a relatively small installation detail, the valve becomes one of the most frequently operated components in the bathroom. Its position should therefore be considered alongside the showerhead, handset, enclosure, bath or shower tray and the overall layout of the room.
A correctly positioned valve allows you to adjust the shower without stretching, bending or stepping unnecessarily into the water stream. This becomes particularly useful when using a thermostatic shower valve, where temperature controls need to be accessible and intuitive.
Valve placement can also influence the visual balance of the shower area. In a contemporary bathroom, concealed shower valves are often selected because they minimise visible pipework and create a cleaner appearance. Positioning the control plate in relation to the showerhead, shower niche and tile layout can make the finished installation look more deliberate and professionally planned.
The position should also reflect the people who will use the bathroom. A family bathroom may need to accommodate adults and children, while an accessible bathroom may require the controls to be positioned according to specific reach and usability requirements.
Another important consideration is the relationship between the valve and the shower enclosure. If the control is located behind a shower door or too close to another fitting, it may become awkward to operate. Ideally, the user should be able to reach the controls comfortably before stepping fully beneath the shower spray.
During a renovation, valve placement should be decided before the plumbing and wall finishes are completed. This allows the installer to account for pipe routes, wall depth, waterproofing, tile thickness and the manufacturer's installation requirements.
Ultimately, the right shower valve position is not simply about achieving a standard measurement. It is about creating a shower system that is comfortable, accessible, visually balanced and practical for everyday use.
Standard Shower Valve Height
The standard height for installing a concealed shower valve or an exposed one typically ranges between 36 to 48 inches from the floor. However, this can vary depending on individual preferences, family needs, and the type of shower setup you have. For example:
- In a walk-in shower, the valve is usually installed around 40 to 48 inches.
- In a bathtub-shower combination, it's positioned lower, typically 28 to 36 inches from the floor, to allow for comfortable access while seated in the tub.
While the commonly recommended range provides a useful starting point, the standard shower valve height should not be treated as a universal rule. The correct position depends on the finished shower floor, the configuration of the bathroom and the design of the selected shower system.
One important consideration is the finished floor level. Measurements should account for the final surface that the user will stand on, including the shower tray or completed tiled floor. Measuring from an unfinished floor during the construction stage can result in the valve ending up at a different practical height once flooring, adhesive and other finishes have been installed.
The position of the valve should also be considered in relation to the showerhead and handset. A well-planned installation creates a comfortable relationship between the controls and outlets, allowing the user to operate the shower without unnecessary stretching or bending. If a handheld shower is installed on a sliding rail, the control position should complement the range of adjustment provided by the handset.
For concealed shower valves, installation depth is just as important as height. The valve body sits behind the finished wall, so the thickness of the wall construction, waterproofing layer, adhesive and tiles needs to be considered before the valve is fixed. The manufacturer's technical drawing should be used to determine the correct finished position of the control plate.
In a family bathroom, the needs of different users should also be considered. Adults, children and users with reduced mobility may have different reach requirements. Where necessary, a flexible shower handset can help accommodate these differences without compromising the position of the main valve.
The valve should also be positioned where it can be reached before entering the main shower spray, particularly when the water requires a few moments to reach the desired temperature.
For renovation projects, it is advisable to mark the proposed valve location on the wall before first-fix plumbing begins. This provides an opportunity to assess the position from a standing or seated position and check its relationship with the shower enclosure, niche, bath and other fittings.
Ultimately, the best shower mixer height is one that combines manufacturer requirements with practical usability. A standard measurement can provide a useful reference, but the final position should always be determined by the specific shower system, bathroom layout and needs of the people using it.
Factors to Consider for Shower Valve Height:-
1. User Preferences
One size doesn't fit all when it comes to installing mixing valves for showers. Consider the height and accessibility of the users. For families with children or elderly members, ensure the valve is reachable and easy to operate.
2. Shower Type
The type of shower system you choose significantly impacts the valve height:
- Handheld Showers: If paired with a handheld shower, ensure the valve height complements the bracket or sliding rail.
- Rain Showers: For overhead rain showers, the valve should be conveniently placed to control water flow without reaching too high or bending down.
3. Shower Mixer Placement
When installing a shower mixer height, ensure it aligns with other fixtures. The mixer controls should be easy to reach while maintaining a sleek and modern look.
4. Design Aesthetics
A well-placed valve enhances the overall visual appeal of your shower area. Keep the design cohesive by aligning the valve with other elements, such as the showerhead or tiling pattern.
5. Local Building Codes
Always check local building codes or regulations for guidance on proper installation practices. This ensures safety, compliance, and long-term reliability.
Pro Tips for Perfect Valve Placement:-
-
Plan Before Installation: Consult with a professional plumber or contractor to map out the exact placement of the shower valves and other components. This minimizes errors and ensures a hassle-free experience.
- Use Markers: Before drilling or mounting, use temporary markers to visualize the valve's height and position. Adjust as needed to achieve the perfect placement.
- Test Accessibility: Make sure the valve is easy to reach and operate for all users. If you're installing a concealed shower valve, ensure the faceplate or lever aligns comfortably with your hand when standing under the shower.
- Future Proofing: Consider potential future needs. If you're planning to age in place, opt for a height that remains convenient as mobility changes over time.
Common Mistakes to Avoid:-
Installing a shower valve involves more than selecting a convenient height. Small planning mistakes can affect accessibility, water performance, appearance and even the long-term maintenance of the shower. Avoiding the following issues can help create a more reliable and comfortable installation.
-
Placing the Valve Too High or Low: A valve positioned at an unsuitable height can make temperature and flow controls difficult to operate. Consider the finished shower floor, the height of the primary users and the overall shower configuration before fixing the valve permanently.
-
Neglecting Water Pressure and Flow Requirements: A shower valve must be compatible with the property's water supply and the requirements of the selected showerhead. Check the manufacturer's minimum and maximum pressure specifications and required flow rates before installation. This is particularly important when combining an overhead shower with a handset or other outlets.
-
Ignoring the Finished Wall Thickness: This is a common issue with concealed shower valves. The valve body must be installed at the correct depth behind the finished wall. Tile thickness, adhesive, waterproofing and wall construction can all affect the final position of the control plate. Always check the manufacturer's installation drawing before closing the wall.
-
Positioning the Controls Where They Are Difficult to Reach: Avoid placing the shower valve directly behind the shower door, too close to another fitting or in a position that requires the user to stand beneath the shower spray before operating it. Ideally, the controls should be accessible from a comfortable position outside or near the entrance to the shower area.
-
Failing to Coordinate the Valve With Other Shower Components: The valve should be planned alongside the showerhead, hand shower, diverter, shower rail and shower niche. Installing each component independently can result in awkward spacing or conflicts between fittings. A simple wall elevation can help establish the position of every component before plumbing work begins.
-
Ignoring Aesthetic Alignment: Functionality should always come first, but visual alignment also contributes to a well-designed bathroom. A control plate that is poorly positioned in relation to the tile grid, showerhead or niche can make an otherwise high-quality installation appear unplanned. Where practical, coordinate the valve with the surrounding tile layout and other bathroom fixtures.
-
Failing to Test and Plan for Future Maintenance: Concealed shower valves should be checked thoroughly before the wall is tiled or permanently closed. Confirm that connections are secure, the valve is correctly oriented, the installation depth is appropriate and the system has been tested for leaks. Also check how the valve will be accessed if its cartridge, seals or other internal components require servicing in the future. Taking photographs of concealed pipework before closing the wall can provide useful information for future maintenance.
A successful shower valve installation depends on coordinating height, water performance, installation depth, accessibility, component positioning and maintenance from the beginning. Taking the time to plan these details before the first-fix plumbing stage can help prevent costly alterations after the bathroom has been tiled and finished.
How to Measure Shower Valve Height Correctly
One of the most important details when deciding where to install a shower valve is understanding exactly where the measurement should start and end.
Shower valve height should generally be considered from the finished floor level, rather than the unfinished structural floor. This distinction becomes important during bathroom renovations because tiles, adhesive, underfloor systems and other floor finishes can increase the final floor height.
For example, if a valve position has been marked before the final floor has been installed, the eventual finished floor level may be higher than expected. Even a relatively small change can affect the relationship between the valve, shower controls, bath, shower tray and other fittings.
When planning the installation:
- Establish the finished floor level first.
- Mark the intended centreline of the valve.
- Account for the thickness of wall finishes.
- Check the manufacturer's installation dimensions.
- Confirm the finished position of the shower controls before fixing the pipework.
- Verify the position again after the wall construction has been completed.
For concealed systems, the centreline and finished face position are particularly important because the visible trim is designed to work within a specific installation depth.
The manufacturer's technical drawing should always take precedence over a generic measurement.
Finished Wall Thickness Matters for Concealed Shower Valves
A concealed shower valve is installed behind the finished wall, meaning the depth of the installation needs to be considered before the wall is closed.
This is particularly important when working with:
- Stud walls
- Plasterboard partitions
- Wall panels
- Thick tiles
- Stone finishes
- Waterproofing systems
- Renovation boards
The valve body needs to sit within the manufacturer's specified installation range so that the external trim, escutcheon or control plate can be fitted correctly.
If the valve is installed too far inside the wall, the finished control may not sit correctly against the surface. If it projects too far, the trim may not sit flush.
This is one reason why concealed shower valve installation should be coordinated with the plumber, bathroom installer and tiler before the wall is finished.
The final wall build-up should be treated as part of the installation specification rather than an afterthought.
Why the Valve and Shower Outlet Should Be Planned Together
The shower valve should not be positioned independently of the shower outlet.
The relationship between the controls and the showerhead affects both usability and the overall appearance of the installation.
A rainfall shower with a ceiling-mounted outlet, for example, creates a different visual and functional arrangement from a wall-mounted shower arm.
If the system includes multiple outlets, such as:
- Overhead shower
- Hand shower
- Body jets
- Bath filler
- Additional shower outlet
the valve configuration needs to accommodate the required functions.
A multi-outlet shower system may require a diverter or separate control mechanism. The position of each control should therefore be established before the pipework is concealed.
Planning the complete shower system as one installation helps prevent situations where the valve looks correctly positioned but the other components are awkwardly arranged.
Single-Outlet and Multi-Outlet Shower Systems Require Different Planning
Not every shower system operates in the same way.
A basic shower may have one outlet controlled by a single mixer. More sophisticated installations can include several outlets that are operated independently or through a diverter.
For example, a bathroom might have an overhead shower and a separate handset.
In this situation, the installation needs to answer several questions:
Which outlet should operate independently?
Will both outlets operate simultaneously?
Where should the diverter be located?
Does the control arrangement clearly identify each outlet?
Is there sufficient water flow for the selected configuration?
These questions are more important than simply choosing a height.
A technically correct valve position is only useful if the complete system has been designed around the required water outlets and operating method.
Thermostatic Shower Valves and Temperature Control
Thermostatic shower valves require particular attention because the control arrangement is designed to provide precise temperature regulation.
Unlike simply controlling flow, a thermostatic system allows the user to select and maintain a desired water temperature while helping compensate for changes in the hot and cold water supply.
This can be especially useful in busy households where other fixtures may be operating at the same time.
When installing a thermostatic shower valve, consider:
- Hot and cold water connections
- Manufacturer-specified inlet orientation
- Minimum and maximum operating pressures
- Temperature control arrangement
- Flow rate requirements
- Service access
- Correct commissioning
The exact installation requirements vary between products, so the technical documentation supplied with the valve should be followed.
A thermostatic valve should never be selected solely on the basis of its appearance or external dimensions.
Understand the Difference Between a Shower Valve and a Diverter
The terms shower valve, mixer valve and diverter are sometimes used interchangeably, but they perform different functions.
A shower mixer or valve primarily manages the water supply and, depending on the design, temperature and flow.
A diverter determines where the water goes when a system has multiple outlets.
For example, a shower installation might use:
Thermostatic valve → diverter → overhead shower / hand shower
In other configurations, the functions can be integrated into a single control system.
Understanding this distinction helps homeowners avoid choosing the wrong component when planning a multi-outlet shower.
Where Should the Shower Valve Be Positioned Relative to the Shower Door?
The valve position should also be considered in relation to the shower enclosure or shower door.
A control that is positioned directly behind a door may be inconvenient to operate. The user may have to reach through the shower area or stand underneath the showerhead before turning the water on.
This can result in an uncomfortable start to the shower, particularly when the initial water temperature is still being adjusted.
Where the layout permits, consider positioning the controls so they can be reached before stepping fully into the shower spray.
This can improve everyday usability and reduce unnecessary exposure to cold or hot water during start-up.
The exact position depends on the enclosure design, door swing and plumbing arrangement.
Consider the Position of the Shower Valve in Relation to a Shower Niche
A shower niche is often installed on the same wall as the shower controls, but the two should not be positioned without considering each other.
The valve should remain easily accessible, while the niche should be positioned where bottles and toiletries can be reached comfortably.
Avoid creating an arrangement where:
- Bottles obstruct the controls
- The valve is hidden behind toiletries
- The niche interferes with the valve body
- The control plate becomes difficult to clean
- Pipework for one feature restricts the installation of another
A coordinated elevation drawing can be useful before construction begins.
This is particularly valuable for bathrooms using large-format tiles, where the location of niches, controls and grout lines can be planned together.
Align Shower Controls With the Tile Layout
Good bathroom design is often about small details.
When installing a concealed shower valve, the control plate can be aligned with the tile grid to create a more deliberate appearance.
For example, the centre of the control can be positioned to relate to:
- A vertical grout line
- A horizontal grout line
- The centreline of the showerhead
- The centre of a shower niche
- The edge of a feature tile
This is not merely an aesthetic exercise. Planning the valve position before tiling can prevent the finished installation from appearing randomly placed.
However, the plumbing requirements and manufacturer's installation specifications should always take priority over purely visual alignment.
How to Plan Shower Valve Placement During a Bathroom Renovation
Renovating an existing bathroom provides an opportunity to improve the shower layout, but it also introduces additional constraints.
Existing pipework may have been installed according to the previous bathroom layout. Moving the shower valve could require changes to:
- Hot water pipework
- Cold water pipework
- Waste arrangements
- Studwork
- Wall depth
- Waterproofing
- Electrical installations
Before moving an existing shower valve, establish whether the existing wall can accommodate the new installation.
In a stud wall, access behind the finished surface may be relatively straightforward. In a solid masonry wall, creating the necessary recess for a concealed valve can involve significantly more work.
This is why the valve position should be decided before first-fix plumbing begins, rather than after the wall has already been prepared for tiling.
First Fix and Second Fix: Why Timing Matters
Shower installation is generally easier to manage when it is divided into two stages.
First-Fix Installation
This is where the concealed pipework and valve body are installed behind the finished wall.
At this stage, the installer establishes:
- Pipe routes
- Valve position
- Connection points
- Outlet positions
- Support and fixing
- Installation depth
Second-Fix Installation
The visible components are installed after the wall and surrounding finishes have been completed.
This can include:
- Control handles
- Faceplates
- Escutcheons
- Showerhead
- Handset
- Hose
- Diverter controls
The first-fix stage therefore needs to be completed with the finished bathroom in mind.
A mistake behind the wall can be considerably more expensive to correct after waterproofing and tiling have been completed.
Leave Appropriate Access for Servicing
A concealed shower valve can create a beautifully minimalist bathroom, but concealment should never mean making maintenance impossible.
Before closing the wall, establish how the valve will be serviced if a cartridge, seal or other internal component eventually requires attention.
The access arrangement depends on the valve design.
Some products are designed so that servicing can be carried out from the front after removing the control plate. Others may require a specific access arrangement.
Always check the product's service requirements before permanently enclosing the valve.
This is particularly important for long-term maintenance and future bathroom renovations.
Shower Valve Position and Water Pressure
Valve placement itself does not determine water pressure, but the overall installation layout can influence how the shower performs.
Pipe diameter, pipe length, water supply characteristics, restrictions, bends and the selected shower outlet can all affect flow performance.
A high-flow overhead shower, for example, may have different water requirements from a small handset.
Before selecting a valve and showerhead combination, check the manufacturer's stated operating requirements.
If the shower is being installed in a property with a low-pressure or unusual water supply arrangement, the system should be assessed before products are specified.
This avoids choosing a shower system that cannot deliver the expected performance under the home's actual water conditions.
Plan the Valve Position Around Grab Rails and Accessibility Features
Accessibility should be considered at the planning stage rather than added after the bathroom has been completed.
For bathrooms intended to accommodate users with reduced mobility, the position of the shower control should work alongside:
- Shower seating
- Grab rails
- Handrails
- Hand showers
- Accessible shower areas
- Support equipment
The control should remain operable without creating an awkward reach or requiring the user to stand in an unsafe position.
For regulated accessible or commercial installations, specific dimensional and performance requirements may apply. UK building guidance should therefore be checked for the relevant building type rather than relying on a generic domestic measurement.
Accessibility planning is also useful in residential bathrooms where homeowners want the room to remain practical as their needs change over time.
Consider the Valve Position for Children and Shared Bathrooms
A family bathroom may be used by people with significantly different heights.
Rather than choosing a position solely around the tallest adult, consider how the controls will be used by everyone.
If the shower includes a separate hand shower on a sliding rail, the handset can provide greater flexibility for different users.
In some family bathrooms, the most practical solution is not to lower the main valve but to combine an appropriately positioned valve with an adjustable handset.
The objective is to provide comfortable control without compromising the overall shower configuration.
Shower Valve Placement in Small Bathrooms
Small bathrooms require particularly careful coordination because every wall surface may have several functions.
A single wall might need to accommodate:
- Shower controls
- Shower outlet
- Shower niche
- Towel rail
- Grab rail
- Feature tiles
- Shower screen
Before installation, create a simple wall elevation showing all major components.
This makes it easier to identify potential conflicts.
For example, a valve may technically fit between the shower screen and niche but still be inconvenient to operate once the bathroom is finished.
In a compact bathroom, visual simplicity and functional accessibility should be planned together.
Avoid Installing the Valve Directly Behind the Showerhead
Although the valve and showerhead may appear visually balanced when positioned on the same vertical axis, this isn't always the most practical arrangement.
If the control is directly beneath the shower outlet, the user may need to stand beneath the water stream to operate it.
A slightly offset control position can sometimes provide a more comfortable operating experience.
The ideal arrangement depends on the shower layout, but the guiding principle is simple:
The controls should be accessible without requiring the user to position themselves unnecessarily under the shower spray.
Think About Future Bathroom Changes
A bathroom installation should ideally remain useful beyond the immediate renovation.
If you anticipate replacing the showerhead, adding a handset or introducing additional functionality later, consider whether the current pipework and wall arrangement can accommodate potential changes.
This doesn't mean installing unnecessary components.
Instead, it means understanding which elements are difficult or expensive to alter after the wall has been tiled.
Future-proofing can be particularly valuable when installing concealed systems because access to pipework may be limited once the bathroom is complete.
Use the Manufacturer's Installation Drawing as the Final Reference
Generic shower valve height guides are useful for understanding typical installation principles, but they should not replace the product's technical documentation.
Different valves can have different:
- Installation depths
- Connection arrangements
- Inlet positions
- Outlet requirements
- Minimum pressure requirements
- Maximum pressure limits
- Temperature ranges
- Service access requirements
For this reason, the manufacturer's installation instructions should be treated as the final technical reference for the selected valve.
This is particularly important for concealed thermostatic valves, where incorrect positioning can affect both installation and the fit of the finished trim.
How to Check the Installation Before Tiling
One of the most valuable quality-control steps is to inspect and test the installation before the wall is permanently closed.
Before tiling, confirm:
- The valve is securely fixed.
- Pipe connections are correctly made.
- Hot and cold supplies are correctly identified.
- Outlet pipework is connected to the correct ports.
- The installation depth is within specification.
- The control position has been checked against the finished wall.
- The shower outlet is in the intended location.
- Any diverter is correctly connected.
- The system has been appropriately tested for leaks.
Taking photographs of concealed pipework before closing the wall can also be useful for future maintenance.
The photographs can provide a visual record of where pipes and connections are located behind the finished surface.
Why Accurate Pipe Alignment Matters
The visible shower controls may look simple, but their final appearance depends heavily on what is installed behind the wall.
Pipework should be properly supported and routed according to the requirements of the system.
Poor alignment can create problems during the second-fix stage, particularly when connecting rigid components or concealed fittings.
Accurate first-fix work also reduces the likelihood of forcing components into position, which can place unnecessary stress on connections.
A professional installation should therefore prioritise correct pipe routing, secure fixing and accurate positioning, rather than simply getting the visible controls to fit.
What to Do If the Shower Valve Has Been Installed at the Wrong Height
If a shower valve has already been installed and the position appears unsuitable, don't immediately alter the finished wall.
First determine:
- The exact finished height
- Whether the valve is concealed or exposed
- The manufacturer's permitted installation range
- Whether the visible controls can compensate for the position
- Whether the issue is functional or purely aesthetic
- Whether the wall is already tiled
- Whether pipework would need to be relocated
In some cases, an apparently unusual position may still be technically acceptable.
In others, correcting the installation before the wall is finished may be substantially easier than attempting to modify it later.
For a concealed valve, the decision should be based on the product's installation requirements rather than a generic height recommendation.
Shower Valve Placement: A Practical Pre-Installation Checklist
Before your plumber begins installation, confirm the complete shower arrangement rather than discussing valve height in isolation.
Shower System
- What type of shower valve is being installed?
- Is it manual or thermostatic?
- Is it concealed or exposed?
- How many outlets are required?
- Is a diverter required?
Wall Construction
- Is the wall solid or stud-built?
- What is the finished wall thickness?
- How much space is available behind the tiles?
- Does the valve require a specific installation depth?
Shower Controls
- Can the controls be reached comfortably?
- Can they be operated before stepping into the water?
- Are they clear of the shower door?
- Are they coordinated with other wall-mounted fittings?
Shower Outlets
- Where will the overhead shower be positioned?
- Where will the handset be positioned?
- Is a shower rail required?
- Are additional outlets being installed?
Finishes
- What is the final tile thickness?
- Where are the grout lines?
- Is there a feature wall?
- Will the control plate align with the tile layout?
Maintenance
- How will the valve be accessed for servicing?
- Are manufacturer-required clearances being maintained?
- Has the installation been tested before the wall is closed?
This approach is far more reliable than selecting a valve height as a standalone measurement.
Enhancing Your Shower Experience with Jaquar
Getting the placement right is only half the equation — the valve itself also has to be built for reliable, everyday use. Jaquar's range of thermostatic concealed shower valves is designed to work within standard wall build-ups while offering precise temperature control, and the wider shower collection covers overhead, handheld and multi-outlet configurations to suit walk-in showers, bathtub-shower combinations and family bathrooms alike.
Whichever configuration you choose, pairing a well-specified valve with careful, floor-level-accurate placement is what turns a technically correct installation into a genuinely comfortable everyday shower.
Conclusion
Choosing the right shower valve position is not simply a matter of selecting a number of millimetres from the floor.
The best installation considers the finished floor level, wall construction, valve type, installation depth, shower outlets, control arrangement, water supply, tile thickness, accessibility, maintenance and overall bathroom layout as one connected system.
This becomes particularly important with concealed and thermostatic shower valves. Once the wall has been tiled, correcting an incorrectly positioned valve can involve considerably more work than getting the first-fix installation right.
The most reliable approach is to plan the complete shower elevation before installation, confirm the manufacturer's technical requirements, coordinate the plumbing with the final wall finish and test the system before the installation is concealed.
For homeowners, designers and installers, the goal should be more than achieving a visually neat installation. The finished shower should be comfortable to operate, technically compatible with the home's water system, straightforward to maintain and appropriately positioned for the people who will use it.
That combination of usability, technical accuracy and thoughtful design is what turns a correctly installed shower valve into a genuinely well-designed showering experience.
FAQ's:
Should shower valve height be measured from the floor or shower tray?
The reference point should be established according to the installation and the manufacturer's instructions. In general planning, the finished floor or finished shower surface is the relevant reference rather than an unfinished structural surface. For shower trays, the final standing level should be considered when determining the control position.
How far should a shower valve be from the showerhead?
There is no universal distance that applies to every shower installation. The relationship depends on the shower design, wall configuration, outlet position and manufacturer requirements. The controls should be positioned for comfortable operation without creating an awkward relationship with the showerhead.
Can a concealed shower valve be installed in a stud wall?
Yes, provided the wall construction offers sufficient depth, structural support and suitable access for the selected valve. The valve must also be installed within the manufacturer's specified depth range.
Can you move a shower valve during a bathroom renovation?
In many cases, yes. However, moving a concealed valve may require alterations to pipework, wall construction and waterproofing. It is generally easier to make the change during the first-fix stage before the wall is closed and tiled.
Does shower valve height affect water pressure?
Valve height itself does not normally determine water pressure. Shower performance is influenced by factors such as the water supply, pipework, pressure, flow rate, restrictions and the specifications of the selected shower system.
Where should shower controls be positioned in relation to the shower door?
Where possible, controls should be accessible without requiring the user to reach through a closed shower door or stand directly underneath the shower spray. The exact position depends on the enclosure design and bathroom layout.
Is a thermostatic valve better for a family bathroom?
A thermostatic valve can provide more precise temperature control and can be particularly useful where several people use the same bathroom. The suitability of a particular valve depends on the home's water system and the manufacturer's operating requirements.
Can the shower valve be installed inside a shower niche?
A shower niche and valve should generally be treated as separate elements unless the selected product and installation arrangement specifically allow otherwise. The controls need to remain accessible, while toiletries stored in the niche should not interfere with operation.
What should be checked before a concealed shower valve is tiled over?
Check the installation depth, valve orientation, pipe connections, outlet connections, structural fixing, waterproofing arrangements and leak testing. Confirm that the finished control plate will sit correctly once the final wall finish is installed.
Does a shower valve need access for maintenance?
The servicing requirements depend on the specific valve. Many concealed systems are designed for servicing through the visible control area, while other installations may require a dedicated access arrangement. Always check the manufacturer's documentation before closing the wall.


-54x36.jpg)


